Tuesday, 29 May 2012

Tyre Replacement

Tyre Replacement

How to change a tyre:

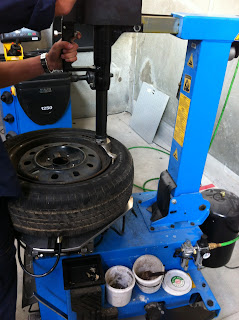
Once all the air has been let out, Then the tyre needs to be pushed off the rim, Both side's need to be pushed off & right round the rim too.
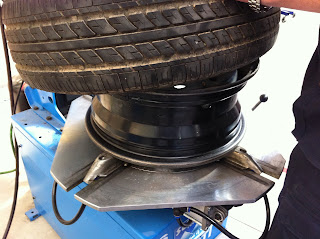
The following pictures bellow are showing you this is done.


Once the tyre has been pushed off, is then put on to the clamps to clamp the rim so the tyre can be removed.


When the rim has been securely clamped, the arm that is showing in the bottom pic & on the right - is lined up with the edge of the rim.


Before using the bar to pull the tyre over the end of the arm a white past needs to be spread around the edge of the tyre. This makes it so the tyre can slide off with out it getting stuck & ripping the tyre.


The video above is showing how to get the tyre back on. You can see the white past on the edge of the tyre. How the tyre is being put back on, is how the tyre is taken off but in reverse.

Tuesday, 22 May 2012

Cooling Systems

Cooling Systems

About the engine cooling systems:

  • The engine cooling system is designed not only to cool the engine but also to not over cool the engine. There is two types of engine cooling systems - (Air Cooling & Liquid Cooling)
  • In automotive engines the hot air is drawn down through the radiator & cooled to a warm operating temperature then passed back through the engine.
  • Coolant is what is pumped through the engine & radiator, Coolant/ Liquid being water mixed with antifreeze.
  • Antifreeze is usually Ethylene Glycol or Propylene Glycol mixed with a small amount of Corrosion Inhibitor.

 Construction:

  • The radiator has multiple parts that help the cool the engine.

Radiator cap

Coolant Expanding - When the coolant rises it pushes against the lower seal, it press's against the Pressure spring, which then the lower seal begins to rise letting the coolant past & dumped into the overflow bottle through the reservoir.
    • Coolant Contracting - Is a smaller version of coolant expanding. When the radiator is running low on coolant it sucks through to the area where the vacuum valve is, once pressure has built up from the coolant. The vacuum spring then opens up the vacuum valve allowing the coolant to pass through.
    • Filler neck - Is what the radiator cap twists on to.


    Radiator Fins/ Core of the Radiator:
    • The core of the radiator is were all the cooling of the coolant happens.
    • The coolant passes through the tubes & the heat from the coolant is passed through to the fins & then evaporates to the air.
    • Having more tubes in the radiator will create better cooling efficiency
    • After the coolant passes through the radiator it then gets pushed through the engine & keeps the engine at a good operating temp

    Pressure Testing The Cooling System


    Remove the radiator cap & replace with the pressure tester cap.
    make sure everything is connected properly.


    Once connected then start pumping away until you can't pump no more.

    Before doing any of the above we need to check for any leaks on the radiator & hoses.
    The longer you leave this the better results.
    Antifreeze Hydrometer - To check that the coolant in the radiator is right. At the green mark is good.


    Thermostat

    What is a thermostat:

    The thermostat opens and closes to regulate the temperature within the engine. When the coolant/ water gets hot from the engine warming up, the wax pallet starts to melt allowing the rod (that is sealed in a rubber diaphragm which is then coated with the wax) to move opening up the thermostat valve. Once the valve has opened then the coolant/water is allowed through to begin to cool the engine down, when the engine has been bought back down to the right temperature it then close's.
    The thermostat close's only by the cooled water running through thermostat & the wax begins to harden.
    The thermostat is located within the thermostat housing, attached to the thermostat housing is the upper radiator hose, Thermo switch & the heater hose. There is a gasket that seals the housing together and prevents any leaks from happening.

    Sunday, 13 May 2012

    Cylinder Block Assembly/ Engine Assembly

    Cylinder Block Assembly/ Engine Assembly

    Purpose of Task:

    To have the understanding of being able to reassemble an Engine, not only to put back together but to know what needs to be torqued.
    To have everything in working order so the engine runs smoothly with out the pistons getting jammed, the crank shaft, cam shaft valves, rockers etc, are freely moving.

    Assembly:


    Before connecting the crankshaft, the Bearing/ Bearing Shells need to be checked and replaced if need be.
    Fitting the main bearings:
    These need to be well lubricated & all bearing bolts need to be torqued at 50% of the specification.
    Picture on right - Showing the bearings


    The crankshaft fitted - Picture on the right


    Picture below - Is us putting the piston ring compressor on.


    Video on how we put the Pistons back in.


    Putting the bearing shells back on, The two groove need to line up together.


    Picture on the right and below are showing torque tightening.
    Note that there is specific Torque specs for different engines


    Torquing with the torquing ratchet
     Picture above - Crankshaft, Bearings, Bearing shells all installed and torqued properly.


    Oil sump plate


    Oil sump Cover


    Never fully tighten the cylinder head bolts with a standard ratchet, a torquing tool is required 
    Picture above & video below is of torquing the cylinder bolts
    There is a specific order in tightening the bolts, starting from the inside working out.


     Putting the timing belt on, the tensioner needs to be loosened to get this back on


    Engine fully assembled.

    Saturday, 12 May 2012

    Cylinder Block

    Cylinder Block

    Purpose Of Exercise:

    Was to dismantle & inspect an engine short block, Clean all the parts and block itself & have a thorough inspection.
    Also to measure the following components:

    The Cylinder bores, Pistons, Rings, Connecting Rods, Crankshaft, Timing Mechanisms, The Cylinder Blocks Surface, Condition & Serviceability.

    Then to Assemble the short block with all parts in correct working order.

    Tools & Equipment:

    Piston Ring Compressor, Torque Wrench, Pullers, Telescopic Gauges, Bore Gauges, Metric Micrometers, Dial Tester, Vernier Callipers, Precision Straight Edge.

    Safety Requirements:

    Safety Boots/ Steal Caped, Overalls & Safety Glasses.

    Measurements:

    Visual Inspection Of Pistons:
    Piston 1 - Has scratches & scuff marks around the skirting/ Guide.  There is a chip on the side, This would have happened from someone being ruff.
    The scratches would have a curd from running the car with little to no oil.
    Pistons 2, 3 & 4 were all in good condition.  

    Measuring Piston Diameter.

    Using a micrometer at 90 degrees from the gudgeon pin & about 10 - 15mm from the bottom of the side skirt.


    Top View of piston head & measuring the side skirt with the micrometer
    Cylinder Bore Visual Inspection:

    All cylinders looked good there was no visible marks that was noticed.

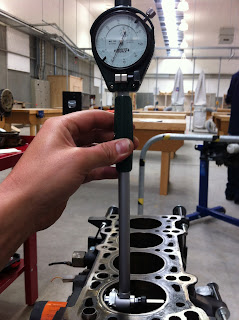
    Bore gauge is used to do this step - picture on left

    Measure in 6 different place's

    Measure Top, Middle & Bottom like the pic on left & following pics then rotate 90 degrees & follow first step.


    Picture on Left - 

    Measuring the middle of the cylinder bore


    Picture on right - Measuring the bottom of cylinder bore


    The following pictures are of the bore gauge rotated on an 90 degree turn & measuring the other side other cylinder bore.

    Picture on left - Top measurement


    Picture on right - Middle measurement


    Picture below - Bottom measurement


    Removing the Piston Rings:
    This is a careful process as they are easy to break when removing.


    Visual Inspection of Rings:
    Checking for wear, cracks & general damage that could effect the duties of the rings.
    Piston Ring End Gap:


    I found lubricating the bores with oil helped make this process easier to get the rings in & out.


    Piston ring in cylinder 1, the ring get pushed down with the piston from that bore until the ring is at the least worn part of the bore.


    Using the feeler gauge to check the end gap of the ring.
    The above picture is of the piston being used to push down the ring in cylinder 2


    Picture on left - Piston ring sitting in the least worn part


    Using the feeler gauge to check the end gap


    Piston Ring Side Clearance:
    This is better done either before checking the piston ring end gap or after when putting the rings back on.


    The Crankshaft


    Picture on left - Is of measuring the big end journals.


    The picture on left - Main End Journals, Measurements need to be taken from the FOUR places. 1st like shown on left. 2nd is parallel to the right closest to the counter weight.


    Big End to the right


    The picture below is showing how the 2nd measurement is done - same as 1st 
    The video below is showing how to use the micrometer & also the 2rd & 4th measurements.
    Excuse the angle.


    Visual Inspection Of The Cylinder Block:


    Looking for - Cracks, Corrosion & General Damage.
    Places to look was on the Block Face, Front Face, Rear Face, Water Jackets & The Exterior Surface.


    Checking The Straightness Of Block:
    Our Block was straight.