Cylinder Block
Purpose Of Exercise:
Was to dismantle & inspect an engine short block, Clean all the parts and block itself & have a thorough inspection.
Also to measure the following components:
The Cylinder bores, Pistons, Rings, Connecting Rods, Crankshaft, Timing Mechanisms, The Cylinder Blocks Surface, Condition & Serviceability.
Then to Assemble the short block with all parts in correct working order.Tools & Equipment:
Piston Ring Compressor, Torque Wrench, Pullers, Telescopic Gauges, Bore Gauges, Metric Micrometers, Dial Tester, Vernier Callipers, Precision Straight Edge.
Safety Requirements:
Safety Boots/ Steal Caped, Overalls & Safety Glasses.
Measurements:
Visual Inspection Of Pistons:
Piston 1 - Has scratches & scuff marks around the skirting/ Guide. There is a chip on the side, This would have happened from someone being ruff.
The scratches would have a curd from running the car with little to no oil.
Pistons 2, 3 & 4 were all in good condition.
Measuring Piston Diameter.
Using a micrometer at 90 degrees from the gudgeon pin & about 10 - 15mm from the bottom of the side skirt.
Top View of piston head & measuring the side skirt with the micrometer
Cylinder Bore Visual Inspection:
All cylinders looked good there was no visible marks that was noticed.
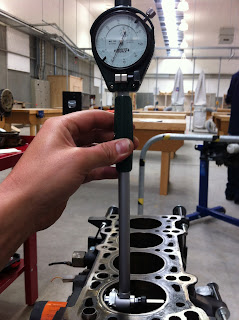
Bore gauge is used to do this step - picture on left
Measure in 6 different place's
Measure Top, Middle & Bottom like the pic on left & following pics then rotate 90 degrees & follow first step.
Picture on Left -
Measuring the middle of the cylinder bore
Picture on right - Measuring the bottom of cylinder bore
The following pictures are of the bore gauge rotated on an 90 degree turn & measuring the other side other cylinder bore.
Picture on left - Top measurement
Picture on right - Middle measurement
Picture below - Bottom measurement
Removing the Piston Rings:
This is a careful process as they are easy to break when removing.
Visual Inspection of Rings:
Checking for wear, cracks & general damage that could effect the duties of the rings.
Piston Ring End Gap:
I found lubricating the bores with oil helped make this process easier to get the rings in & out.
Piston ring in cylinder 1, the ring get pushed down with the piston from that bore until the ring is at the least worn part of the bore.
Using the feeler gauge to check the end gap of the ring.
The above picture is of the piston being used to push down the ring in cylinder 2
Picture on left - Piston ring sitting in the least worn part
Using the feeler gauge to check the end gap
Piston Ring Side Clearance:
This is better done either before checking the piston ring end gap or after when putting the rings back on.


The Crankshaft

Picture on left - Is of measuring the big end journals.
The picture on left - Main End Journals, Measurements need to be taken from the FOUR places. 1st like shown on left. 2nd is parallel to the right closest to the counter weight.

Big End to the right
The picture below is showing how the 2nd measurement is done - same as 1st
 The video below is showing how to use the micrometer & also the 2rd & 4th measurements.
Excuse the angle.
Looking for - Cracks, Corrosion & General Damage.
Places to look was on the Block Face, Front Face, Rear Face, Water Jackets & The Exterior Surface.
Checking The Straightness Of Block:
Our Block was straight.


No comments:
Post a Comment