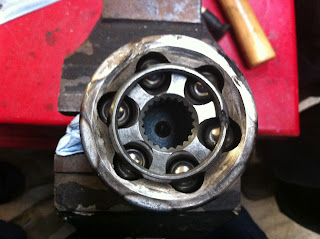
Constant Velocity Joints
Safety & Resources Needed:
Overalls & safety boots must be worn at all time's.
Also when using the tools provided, safety glasses must be worn.
Tools needed are - Circlip pliers, Soft face hammer, A range of flat head screw drivers & a set of bronze punches.
Also 1 C.V Joint.
Inspecting the C.V Joint:
First step is to remove the interconnecting shaft/ axle from the vehicle so it can be cleaned and thoroughly inspected for any possible faults.
Before mounting the axle into a vice, The rubber seals & boots need to be checked for cuts, splits & any damage on the outer area.
Next is to mount the axle into the vice, remembering to use soft jaws to protect the axle.
Once mounted into the vice we then check for roughness or binding by turning the joint in a circular motion.
This tells us if the balls inside the cage are sticking or moving to freely.
Dismantling the joint:
All clips holding the boot in place must be removed & the boot it self slide's back back off the joint.
The C.V joint we were working on has snap ring's instead of internal circlips.
To get the CV apart, you can use a slide hammer or a bronze punch & a soft head hammer. When knocking of the joint pull on it at the same time so it is easier to come off.
Once the joint has been removed we placed it back into the vice so we can remove the balls, cage & the inner race.
To remove the balls, a bronze punch must be used because it is softer compared to other punches and want damage the cage when tapping on it.
Using the bronze punch gently tapping on the cage until a ball is able to become free.
The video below will show you how this process is done.
Once the balls, inner race, cage & housing has been removed they all need to be cleaned and thoroughly inspected.


With the balls we looking for ovality, chips & even worn down points. The balls sit in inside the slots in the cage
The cage is on the right. As you can see our one has a big chip on the edge running down the face of the cage.
This one will need replacing

The inner race sit's inside the cage, The groves on the inner race is what the balls move around on.
The middle of the inner race connects to wheel end of the axle.
We are looking for small and large indents or even possible chips. The spinals in the middle of the inner race we are looking for points where it could have worn down.
The housing/ outer race is on the right - we looking for wearing down points, small & big indents.

Once everything has been inspected and all damaged parts have been replaced, then the joint can be put back together.
All clips holding the boot in place must be removed & the boot it self slide's back back off the joint.
The C.V joint we were working on has snap ring's instead of internal circlips.
To get the CV apart, you can use a slide hammer or a bronze punch & a soft head hammer. When knocking of the joint pull on it at the same time so it is easier to come off.
Once the joint has been removed we placed it back into the vice so we can remove the balls, cage & the inner race.
To remove the balls, a bronze punch must be used because it is softer compared to other punches and want damage the cage when tapping on it.
Using the bronze punch gently tapping on the cage until a ball is able to become free.
The video below will show you how this process is done.


With the balls we looking for ovality, chips & even worn down points. The balls sit in inside the slots in the cage
The cage is on the right. As you can see our one has a big chip on the edge running down the face of the cage.
This one will need replacing

The inner race sit's inside the cage, The groves on the inner race is what the balls move around on.
The middle of the inner race connects to wheel end of the axle.
We are looking for small and large indents or even possible chips. The spinals in the middle of the inner race we are looking for points where it could have worn down.
The housing/ outer race is on the right - we looking for wearing down points, small & big indents.

Once everything has been inspected and all damaged parts have been replaced, then the joint can be put back together.


No comments:
Post a Comment